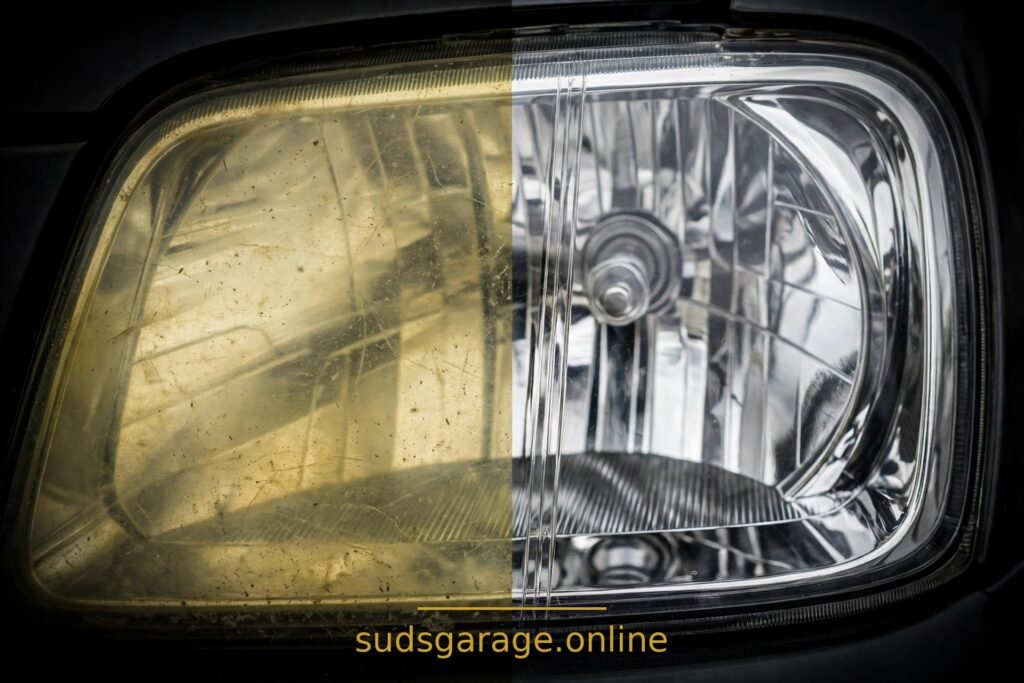
TL;DR: Learning how to restore cloudy headlights at home starts with one fact: most cloudy headlights are cloudy on the outside: years of sun have oxidized the clear coat on the plastic lens. You can fix that at home in one afternoon — wash, tape off the paint, wet-sand through progressively finer grits, polish, and seal with a UV protectant. Skip the sealant and the haze comes back fast. If the fog is inside the lens, or the plastic is cracked, this routine will not fix it — that is a replacement question, not a polishing question.
In this guide:
- Why headlights go cloudy (and how to tell outside damage from inside damage)
- What you need
- Step by step: wash, tape, sand, polish, seal
- When to stop — the honest limits
- Mistakes that make headlights worse
- FAQ
Why headlights go cloudy (and how to tell outside damage from inside damage)
Modern headlight lenses are polycarbonate plastic, not glass. From the factory they carry a thin UV-resistant clear coat. Sun, heat, road grime, and car-wash chemicals wear that coat down over the years, and once it fails, the plastic underneath oxidizes. That is the yellow, hazy look: it is not dirt sitting on the lens, it is the surface of the lens itself breaking down. That is also why washing alone never fixes it — you cannot wash away oxidation.
Before you sand anything, check whether the damage is outside or inside. If the surface feels rough, dry, or chalky, the damage is on the outside and this guide applies. If it feels smooth but still looks foggy, or you can see moisture or a milky film behind the lens, the problem is inside — a failed seal or internal degradation — and no outside sanding will clear it. The same applies to cracks and deep stone chips: those are beyond a home restoration.
One more check: clean the lens properly first. A surprising number of “cloudy” headlights are just filthy. Wash with car shampoo and dry before you judge. If it still looks hazy after a proper wash, you are dealing with oxidation, and the steps below are the fix.
What you need
- Car shampoo, a wash mitt, and a bucket — the lens must be clean before sanding, and the whole routine starts with the scratch-safe wash in our guide to how to wash a car without scratches.
- Painter’s tape, wide enough to protect the paint and trim around the lens. This is not optional. Sandpaper near unprotected paint is how a headlight job becomes a paint repair.
- Wet/dry sandpaper in 800, 1500, and 2000 grit (3000 grit as a finishing step if you can get it).
- A spray bottle of clean water, or a bucket of water for soaking the paper.
- A plastic polish or a fine finishing polish — the same kind of product used for light paint correction, which our guide to how to remove swirl marks by hand covers in detail.
- A couple of foam applicator pads and several clean microfiber towels.
- A UV sealant made for headlights, or a dedicated headlight coating. This is the step that decides whether your work lasts months or years, so do not plan to skip it.
- Gloves, and safety glasses if you are working at eye level with spray and sanding residue.
A restoration kit bundles most of this, and for a first attempt one is a sensible buy — just check it includes a UV sealant, not only polish, or the haze returns within weeks.
Step by step: wash, tape, sand, polish, seal
Step 1: Wash and dry the lens
Wash the headlights with car shampoo and a mitt, and dry them — sanding over grit grinds it into the plastic. While you wash, confirm the damage is on the outside, as described above.
Step 2: Tape off everything around the lens
Run painter’s tape around the full edge of the headlight — paint, bumper, grille trim, rubber seals — overlapping slightly onto the lens edge so sandpaper never touches paint. Press it down firmly. Work in the shade, on a cool lens.
Step 3: Wet-sand from coarse to fine
Soak the 800-grit paper in water for a few minutes. Keep the lens wet throughout — spray it constantly, or dip the paper often. Sand in straight, even lines, one direction only, with light to moderate pressure. Do not press hard and do not sand in circles; the goal is to remove the failed clear coat evenly, not to dig into the plastic.
After a few minutes, wipe the lens and look. It will look worse — milky white, uniformly dull. That is normal and expected. The oxidized layer is coming off, and the surface is now evenly rough instead of patchily oxidized.
Rinse the lens, switch to 1500 grit, and sand again in straight lines, this time at a right angle to your first direction if you can — that makes it easy to see when the previous grit’s marks are gone. Rinse, then repeat with 2000 grit, and with 3000 if you have it. Each finer grit removes the scratches of the one before. By the end the lens should look evenly hazy, like frosted glass, with no visible sanding lines or shiny patches. Shiny patches mean you missed a spot; go back over it with the current grit.
Take your time: rushing the sanding stage is the most common reason a restoration looks patchy. One headlight typically takes 20 to 40 minutes.
Step 4: Polish to clear
Apply plastic polish to a foam pad and work one headlight at a time, overlapping straight lines, moderate even pressure. Wipe off and inspect — the lens should now be clear. If faint marks remain, do another polish pass, or go back one grit finer and polish again. Do not press harder; let the polish and pad do the work.
Step 5: Seal with UV protection
This is the step people skip, and it is the reason most home restorations fail within months. The factory UV coat is gone — you sanded it off — so the bare plastic is now exposed to the same sun that damaged it before. Apply a headlight UV sealant or coating exactly as its label directs: usually a thin, even wipe-on layer, left to cure without touching, washing, or rain for the time stated. Do not wax over it immediately unless the product says you can; wax is not a UV sealant and it will not protect the lens the same way.
Remove the tape only after the sealant’s initial set time, pulling away from the lens, not across it. Compare both headlights in daylight — they should match closely. If one is still hazier, it needed more sanding time, which is worth knowing before you seal, so always polish and compare both lenses before opening the sealant.
When to stop — the honest limits
Stop and consider replacement or a professional if any of these are true:
- The fog is inside the lens, or there is standing water or heavy condensation inside the housing.
- The lens is cracked, deeply pitted from stone chips, or heat-damaged and distorted.
- Sanding through several grits barely changes the lens, which usually means the damage goes deeper than the surface layer.
- The headlight housing itself is damaged, the mounting is broken, or the light output is still poor after restoration — a restored lens does not fix a failing bulb, reflector, or wiring problem.
A home restoration is for outside oxidation on an otherwise sound headlight — which covers most cloudy headlights on daily drivers. It is not a repair for a broken lamp.
Mistakes that make headlights worse
- Dry sanding. Sandpaper on dry plastic cuts fast, deep, and unevenly. Keep everything wet, always.
- Skipping grits. Jumping from 800 straight to polish leaves sanding marks you cannot polish out. Every grit in the ladder earns its place.
- No tape, or tape that lifts. One slip of coarse paper across paint leaves a scratch needing its own correction. Tape generously.
- Sanding in circles. Circular sanding marks show up in the finished lens as swirls, exactly like paint swirls. Straight lines, one direction per grit.
- Skipping the UV sealant. A polished but unsealed lens re-oxidizes quickly, sometimes within weeks in strong sun. Seal it, or do not start.
- Polishing a dirty lens. Grit under the polishing pad scratches the surface you just sanded smooth. Wash first, and keep towels clean.
FAQ
Does toothpaste really work on cloudy headlights?
Toothpaste is a very mild abrasive, so it can improve very light haze, but for real oxidation it is far too gentle to remove the failed clear coat evenly, and the result is patchy and short-lived. It works as a quick test of outside damage, not as a substitute for sanding and sealing.
How long will a restoration last?
With a proper UV sealant, a year or more is realistic; without one, weeks to a few months in strong sun. Reapplying sealant every 6 to 12 months stretches that further. Nothing lasts as long as the factory coating, but a maintained restoration is still a huge improvement over cloudy lenses.
Can I skip the sealant and just wax the lens?
Wax adds a little protection, but it is not designed to block UV the way a headlight sealant is, and it wears off quickly on a forward-facing lens. If you have already done the sanding and polishing work, sealing properly is a small extra step that protects all of it. Wax on top of a cured sealant is fine if you like, but wax instead of sealant is a false economy.
Will restored headlights pass inspection?
Inspection usually cares about light output and beam pattern, not a perfect lens. A clear restored lens is a big improvement over a yellowed one; if output is still poor, the problem is likely the bulb, reflector, or internal damage.
One headlight is much worse than the other. Should I do both?
Yes, do both, and do the worse one first so you learn the timing on it. Restoring only one leaves the car looking lopsided, and the un-restored lens will keep getting worse while the restored one stays clear. Doing both in one session also means the sealant ages evenly on both sides.
Closing note: SudsGarage is a DIY information blog, not a detailing service. Nothing here is a booking offer, and no result is guaranteed — lens age, plastic condition, and previous damage all affect the outcome. If a lens is cracked, leaking, or damaged inside, a replacement is the right answer, not more sanding.