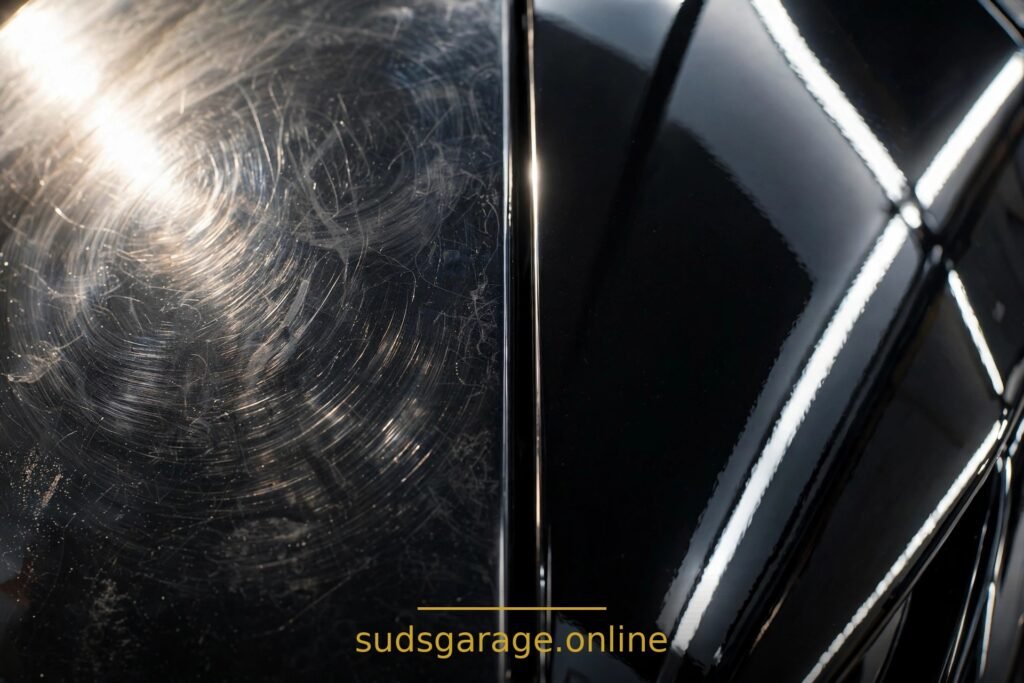
Learning how to remove swirl marks by hand starts with one limit: hand polishing can improve light swirl marks, but it cannot fix deep scratches or heavy damage — and that limit is the most important thing in this guide. Wash and clay the paint first, work a small section at a time with a finishing polish or light compound on a foam applicator, wipe off, inspect in good light, and protect the paint afterward. If the marks survive two careful passes, or you can feel them with a fingernail, stop: that job needs a machine polisher, not more hand pressure.
In this guide:
- What swirl marks actually are (and why that matters)
- What you need before you touch the paint
- Step by step: wash, clay, polish, inspect, protect
- When to stop — the honest limits of hand polishing
- Mistakes that make swirls worse
- FAQ
What swirl marks actually are (and why that matters)
Swirl marks are fine scratches in the clear coat — the transparent layer on top of your paint — usually left by washing in circles, dirty towels, or automatic brush washes. They show up as a spiderweb pattern in sunlight or under bright lights, and they look worse on dark cars because dark paint reflects light more clearly.
Why does this matter for hand polishing? Because hand polishing works by leveling a tiny amount of clear coat around those fine scratches until the surface reflects evenly again. That only works when the scratches are shallow and confined to the clear coat. A scratch you can catch with your fingernail has usually gone deeper, and no amount of hand rubbing will level it safely. Knowing that before you start saves you hours of frustration and protects your clear coat, which is thin and cannot be replaced without a respray.
What you need before you touch the paint
- A clean, washed car. Never polish a dirty panel — polishing grinds whatever is on the surface into the paint.
- A clay bar or clay mitt and lubricant (a dedicated clay lubricant, or a diluted car shampoo solution used as directed).
- A foam applicator pad, plus a second clean pad for the finishing step.
- A finishing polish for light swirls, and a light hand compound only if the finishing polish does not touch the marks. Start with the least aggressive product that might work.
- Several clean microfiber towels for wipe-off, kept separate from your wash towels.
- A spray bottle of diluted isopropyl alcohol and water for a final wipe-down, if you want a true look at the result without polishing oils hiding it.
- Shade and cool panels. Polish dries too fast on hot paint and becomes hard to remove.
One more thing: do a test spot first. Pick a small, inconspicuous section — a lower door panel, for example — and run the full routine there before committing to a whole panel. If the test spot improves, you have the right product and pressure. If it does nothing after two careful passes, a stronger product or a machine is the answer, not more elbow grease.
Step by step: wash, clay, polish, inspect, protect
Step 1: Wash and dry properly
Wash the car using the scratch-safe routine in our guide to how to wash a car without scratches. Dry it fully. Polishing over dust or dried wash water just adds new marks while you try to remove old ones.
Step 2: Clay the panel
After washing, run your hand lightly over the paint. If it feels rough or gritty, bonded contaminants — tar, sap, industrial fallout — are still stuck in the surface, and polish will drag them around. Glide a clay bar or clay mitt over a lubricated section using light pressure and straight lines. When the surface feels smooth like glass, wipe it dry and move on. If you drop the clay, throw that piece away — a dropped bar picks up grit that will scratch.
Step 3: Work one small section at a time
Put a few small drops of finishing polish on a clean foam applicator pad. Work a section roughly two feet square, using overlapping straight lines or small crosshatch passes with light to moderate, even pressure. The goal is consistent, patient coverage, not force. Let the abrasives in the product do the work. You will feel the product go from wet to slightly tacky, and it will start to turn translucent as it breaks down — that is your cue that the pass is done. Wipe the residue off with a clean microfiber towel, turning to a fresh section of towel as you go. Then look at the section in good light — sunlight, or a bright handheld light held at a low angle across the panel. Low-angle light is honest light: it shows swirls that overhead light hides.
Step 4: Decide whether a second pass is worth it
If the section looks clearly better, you can do one more careful pass with the same finishing polish, or move on to the next section. If the first pass did almost nothing, step up to a light compound for one pass on that section, then follow it with the finishing polish to refine the finish — compound alone leaves its own haze. Never jump straight to the strongest compound you own. Clear coat is thin, and every pass removes a little of it. Keep track of what you have done. It is easy to lose count on a big panel and overwork one area while missing another. Work panel by panel, section by section, and inspect as you go.
Step 5: Wipe down and protect
Once a panel is done, wipe it with a diluted isopropyl alcohol solution on a clean microfiber towel if you want to see the true result. Polishing oils can fill fine scratches temporarily and make a panel look better than it really is; the wipe-down removes that disguise. Then protect the freshly polished paint with wax or sealant, following the product’s own instructions. Freshly polished paint has no protection left on it, and unprotected paint picks up new swirls faster than protected paint does.
When to stop — the honest limits of hand polishing
Stop and reassess if any of these are true:
- You can feel the scratch with your fingernail. That is usually too deep for safe hand correction.
- Two careful passes with a light compound have barely changed the section. More passes mostly risk the clear coat.
- The paint is already thin, peeling, or previously resprayed in that area. Thin or failing clear coat does not forgive aggressive polishing.
- The damage covers large areas or the whole car. Hand polishing a whole car is slow, and uneven results across panels are almost guaranteed. A machine polisher, or a professional, is the realistic route there.
Hand polishing shines on light wash swirls, haze, and small sections — a door, a trunk lid, a fender that catches the sun. That is a real, useful win. It is not a substitute for machine correction on moderate to heavy damage, and pretending otherwise is how good paint gets hurt.
Mistakes that make swirls worse
- Polishing a dirty car. Every speck of grit becomes an abrasive under your pad.
- Pressing harder when the product does nothing. Pressure does not replace the right product, and it adds heat and new marks.
- Working in the sun on hot panels. Product dries on the surface, becomes hard to remove, and leaves residue that looks like new defects.
- Using the same towel for everything. A towel that wiped off compound should not be the towel you use for the final inspection wipe.
- Skipping protection afterward. Freshly polished paint is bare paint. Leaving it unprotected invites the same swirls back quickly.
- Chasing perfection on one section. A panel that is 80 percent better and evenly finished looks far better in real light than a panel with one over-polished, hazy patch.
FAQ
Can swirl marks be removed completely by hand?
Light ones can be improved a great deal, and sometimes they become invisible in normal light. Complete removal depends on how deep they are and how much clear coat is available to level. Moderate to heavy swirling usually needs a machine polisher for a consistent result, and deep scratches need more than polishing altogether.
How long does hand polishing take?
A single panel, done carefully with wash and clay beforehand, can take 30 to 60 minutes. A whole car by hand is a multi-day job, which is why hand polishing makes most sense for a few visible panels rather than an entire vehicle.
Will polishing remove my wax or sealant?
Yes. Polishing removes protection along with a thin layer of clear coat, which is why the protection step at the end is not optional. Reapply wax or sealant to every panel you polished.
Can I polish over ceramic coating?
Polishing removes coating, so polishing a coated panel means that panel’s coating is gone in the polished area and needs to be reapplied. If your car has a coating and you are unsure, check the coating’s own care guidance before polishing anything.
Why do swirls keep coming back after I polish?
Because the cause is usually the wash routine, not the polish. If washing, drying, or towel habits stay the same, new swirls arrive with the next few washes. Fix the wash first — our wash guide covers it — and the polish will last far longer.
Closing note
SudsGarage is a DIY information blog, not a detailing service. Nothing here is a booking offer, and no result is guaranteed — clear coat thickness, paint condition, and previous damage all affect what hand polishing can achieve. When in doubt, test a hidden spot first, and stop before you risk the clear coat.
Pingback: Ceramic Coating at Home: Is It Worth It for Beginners? - SudsGarage